What do you get when you cross Assassins Creed Odyssey with historical costuming? This, apparently.

Ahead you’ll find the historical inspiration and process behind making a hand painted Grecian peplos.
The History

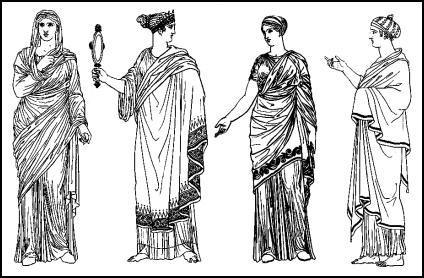
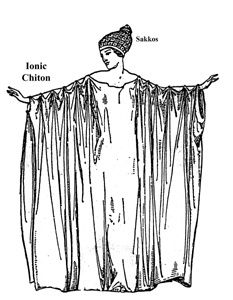
Most fashion in the Greco-Roman World was a series of rectangles draped and pinned in different ways to form to the body. The chiton was the basic garment of Ancient Greece, which was a rectangle pinned at the shoulders and belted at the waist. The Doric chiton was a rectangle folded over at the top and closed on both sides. The Ionic chiton was a much wider rectangle pinned all the way down the arms to form sleeves, then belted at the waist without the additional fold over.

The peplos, was a rectangle with the top folded over and open at one side. A himation, or cloak, was a diagonally draped rectangle that served as an outer, cloak-like garment. While both men and women would wear a full length chiton, the peplos was a feminine style and the short chiton was a masculine one.
The Design
Since the only “pattern” this required was a rectangle calculation, I used this opportunity to focus on the details. To start out, I cut out two lengths of cotton gauze, then shaped the front peplum into a curve. These would eventually be the front and back pieces.
Next, I dyed both pieces. Even though I had a large pot to work with, I had to dye them in separate dye baths which turned out not so great (Which, really, why didn’t I use that as an excuse to get a cauldron?!). I didn’t consider that using the same exact dye for both fabrics wouldn’t turn out the same, which was a huge oversight! I used this color mix recipe, but one of the colors failed to absorb on the second round.

First colors after one dye bath each, still wet
I used the stovetop method to dye my fabric since I usually find it gives the best color result, and usually it works fine! I would have been perfectly okay if I hadn’t tried to split it up.

Colors getting closer! (Still wet)
I did three additional dying attempts after the first fail, and got them close enough that I didn’t want to risk dying them any more and messing it up.
The weird thing is that the color difference showed up SO differently in different lights. The pictures above are the same two fabrics first indoors (where the color difference is a lot more obvious) to outside in natural light where you can hardly tell they’re not the same. I’m a little disappointed I didn’t plan more, but I still don’t think it’s horrendously noticeable so I’m living with it.
After the dye, I needed to hem the raw edges, which I did with a hand rolled hem.

Hand rolled hem! The texture of the fabric makes it almost invisible
I painted on the design in several steps.

painting over the pattern
- Draw out the design on graph paper.
- Transfer design to fabric. I did this in a lot of painstakingly slow steps since the fabric wasn’t sheer enough to trace through and wouldn’t take the color of a tracing wheel and transfer paper at all. I also wanted to be able to see what I was doing at all times since the gauzy texture gave the fabric permanent texture. First I would measure the base elements of the design and mark the measurements on the edge of a piece of card stock to transfer onto the fabric. I worked gradually through the pattern until the whole section was finished. I also had to be extremely careful, since a sharpie pen was the only thing that would transfer well, and was thus permanent.
- Paint over the markings with bronze fabric paint. I used Jacquard Lumiere Metallic Fabric Paint and I loved it! If you use it, make sure you order online instead of finding it in a store since it’s a lot cheaper on craft supply sites rather than on a shelf in Hobby Lobby or Michael’s.
I repeated this process for about ten yards of patterns. I thought the actual work might be dull, but it’s easy to get into the groove and make it through a whole audiobook in one sitting. I love how even and neat it turned out, especially since I did no testing at all for the painting portion.

Finished patterns!
I sewed metal beads onto the front edge of the peplum since it tended to bunch up at the waist and I needed a little weight to pull it down. Before attaching them, I painted them with the same bronze fabric paint then sealed them with a Krylon clear glaze.

Finally, I made a belt out of a trim I got for $3 at a local discount fabric store by folding each edge over twice and tacking down. I added three hooks and bars at the back for a secure closure.

For accessories, I dug out some old costume jewelry from a stash from my grandma. For shoulder pins, I attached some clip on (!!) earrings to pins and used them to secure the shoulder points.

And that’s my finished Grecian peplos! I really enjoyed all the hand work on this and experimenting with painting techniques.
Thanks for reading and come find me on instagram and tumblr for regular updates!


